The top three lighting problems for newborn photographers…and how to fix them!
I’ve been teaching photography, mainly newborn photography, for nearly nine years…and the resounding problem that most photographers come to workshops with is lighting. (Followed closely by marketing, but that’s another blog post!) But before we dive into the main problems I see, and how to fix them, take a look at my in-home natural light newborn set up from 2010..
.
Completely unintentional because I didn’t know what I was doing, this might be one of the only times I set up for actual good lighting. See how the light is to the side? This is actually super similar to my set up now. But my typical lighting back then looked something like this…

See how far away I am from the window light? See how that light isn’t filtered? Also, look how the light would be hitting the baby’s face straight on. Pretty much the only good thing going on in this picture is that I’m staying right next to the baby and spotting him, keeping him safe. (Sidenote: If you ever go to a workshop that doesn’t have a trained spotter (not a parent) with eyes on baby at all times and a hand hovering above baby at all times feel free to tell them that Rachel Vanoven says they suck and shouldn’t be teaching newborn photography if they aren’t keeping those precious babies safe.)
So going off of these two images, I’m going to help you guys out with the three biggest lighting mistakes that newborn photographers make, the problems they cause, and how to fix them!
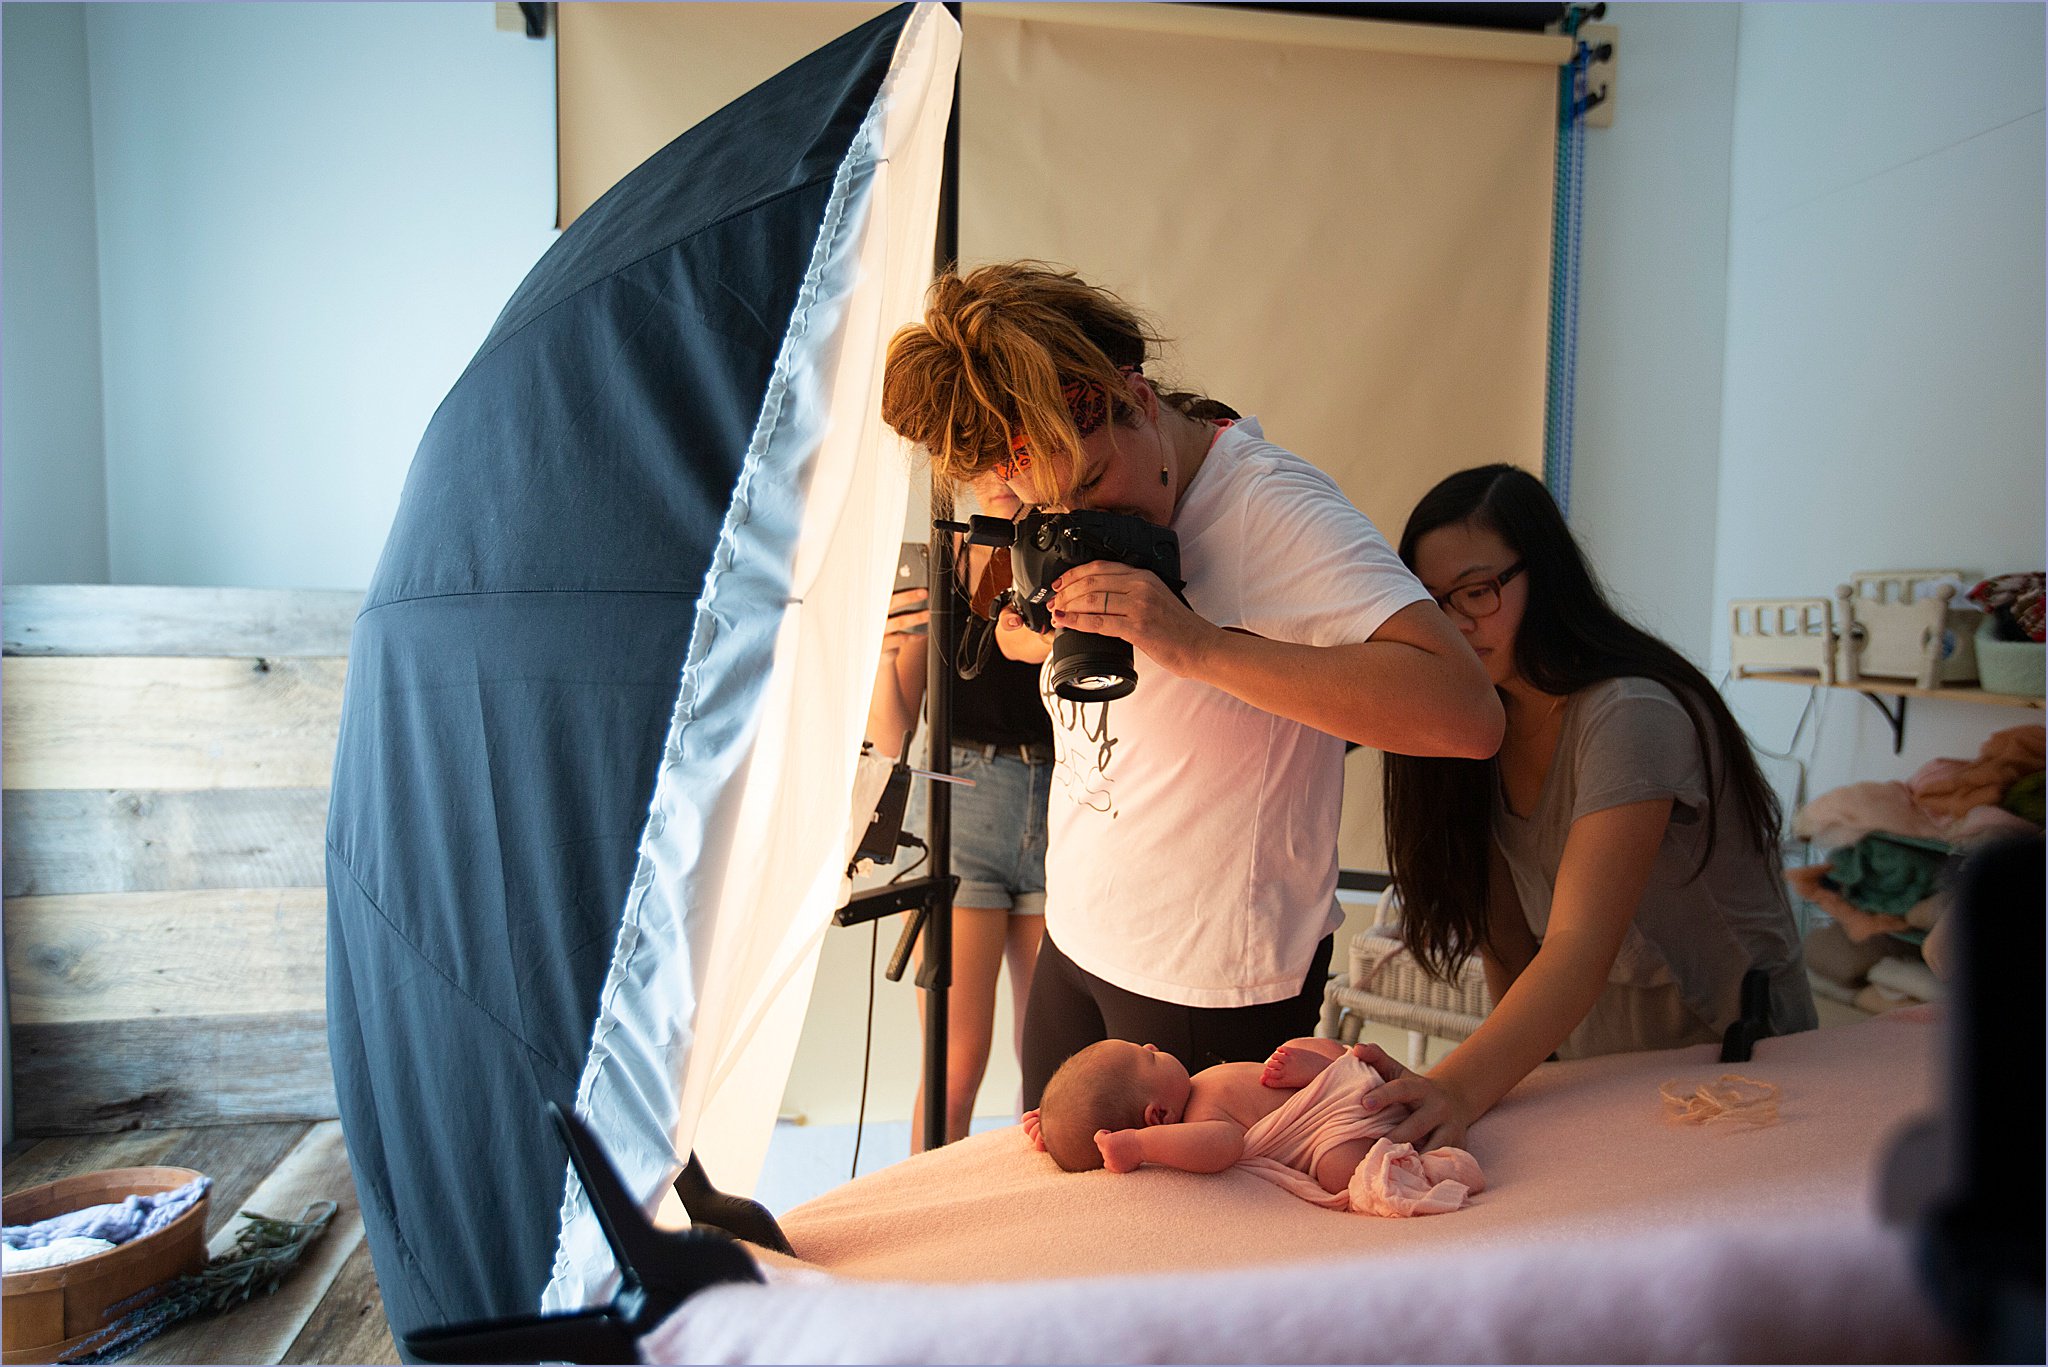
The number one biggest mistake is distance. The basic, boiled down rule of light is that the closer that you are to the light source, the softer the shadows will be. So the further you get from the light, those shadows will be longer and more contrasted. You can test this out with anything, a lamp, window, cell phone screen, etc. This is why when you see BTS shots of me photographing newborns I’m always all up in my PLM umbrella, wedged on the other side next to the bean bag. It’s also why I use a Paloma Schell, opposed to rectangular bean bags that keep the light a few inches further!

See how the umbrella is touching the bean bag, and how the baby is near the edge of it (hence ALWAYS using a spotter!) while I’m so close to the light that my big ol’ messy bun is pushing into the cover! I’m so excited for this month’s Collective video, where I’ll be demonstrating how much the light changes depending on how far it is to the baby!
The second biggest issue that I see photographers having with their lighting is the angle that they have their light. This is something that if you’re using studio light on an easy to adjust stand (mine is from Amazon) that you can fix really easily, but if you’re using natural light, you’re going to have to work a little bit harder to get the light coming in at the right angle!
The pose that I see this lit incorrectly by far the most is the froggy pose. Here’s a great example/pullback of me fixing ghoul lighting during this pose:

See how in the first shot, how low the light is? This is going to shoot light up her face/nose, creating the same effect you would get if you were telling spooky stories around the campfire and you held a flashlight up under your nose. Not flattering at all, pretty much the worst kind of light in my book. So since this pose the babies are elevated more than any other shot, photographers tend to uplight/ghoul light babies! See how much higher the light is in the third picture? That’s the sweet spot! (Baby Blythe approves)

So keep this in mind not only when you’re shooting froggy, but every pose! Make sure that the light is coming from above first and foremost! We’ll be getting into a lot more detail in this month’s Collective video, but this is a great starting point for anyone struggling with lighting!
The third and last biggest struggle we are going to cover is understanding the power of your light and how you filter it. I use an Einstein640 light and I love it because the power goes so low, which is perfect for newborns since we are able to shoot with the light so close to our subject and we are shooting with such a shallow aperture (I keep mine around 2.8-3.5)! For adult portraits/needing a larger area to photograph and working with a higher aperture, the ability to shoot with a lower power isn’t as important. I’ve traveled all over the world and used about every kind of light on the market, and it is a struggle to get the softness I’m looking for when you are used to the 1/256 power that the E640 has. If you’re shooting studio light, the filter part is easy, umbrellas and soft boxes include different diffusion covers.
Now, for my natural light photographers – first off, I’m one of you! For real! I know I don’t post about using natural light a bunch, but I shoot with only window light every single newborn session! I have a window in my studio that I designed just for shooting (it is raised, so I can avoid ghoul lighting) and I use it for prop and sibling shots.

So you can see that I treat my studio light and my window/natural light the exact same. My subject is right up next to the light source, it’s coming from above, and the last piece to the puzzle, I have it filtered! Now these curtains are from Urban Outfitters and I love them because they are strong enough to soften the light on sunny days while being totally gorgeous and meshing with the style of my studio!
A few last tips if you’re struggling with your light:
1. Turn off all other lights in the room! No lamps, overhead lights–nothing!
2. Take your time and be intentional, there’s no rush and bad lighting will ruin even the best posing, so tweak until the light looks perfect! I use my modeling light on my Einstein, so I can see exactly how the shadows are going to be.
3. My personal favorite type of lighting is Rembrandt Lighting or side lighting where my goal is to get half of my subjects face lit (from above the face, even if the face isn’t facing up…if that sounds confusing, it kinda is, I’ll explain it SO MUCH MORE in this month’s Collective video, I promise), and then a little triangle of light on the other cheek.
I hope SO much that this helped those of you struggling with light <3 Just remember, you got this.

I love your explanation about the ghoul lighting! I’ve never thought of it like that before and it makes perfect sense!
Great article! I love photographing newborns on the beach. The sound of the waves put them right to sleep, and let’s be honest the beach and snuggling newborns are my two favorite things so I am in heaven. Thank you